Inspirated


April 26, 2011

There and Back Again — Google Summer of Code 2011

Filed under: Blog — krkhan @ 3:43 am

GSoC 2011 Logo

After completing my project for last year‘s Summer of Code my degree was delayed for a while because of flunking a few courses. Glass half full, this gave me the chance to participate once more before I finally graduate this summer — Deo volente.

In a repeat of last year I once again became a duplicate student as my proposals for both Fedora and Tor projects ended up in top slots. Both organizations were really nice in the de-duplication process and inquired about my preference which inclined towards Tor since it allowed me to contribute to fields of privacy and anonymity. In words of Free Software Foundation:

Using free software, Tor has enabled roughly 36 million people around the world to experience freedom of access and expression on the Internet while keeping them in control of their privacy and anonymity. Its network has proved pivotal in dissident movements in both Iran and more recently Egypt.

This by no means implies any lesser significance for Fedora in my life and I would have been as much enthused had it been my mentoring organization for the summer instead of EFF. However, since I had to make a choice I went for the option where I would be contributing more directly to privacy enhancing technologies.

My project this summer revolves around improving the excellent Anonymizing Relay Monitor (arm) which is used by the Tor community to monitor and control bridges and relays. The complete proposal can be read here (or via the original PDF). It contains nitty-gritty details of my summer aspirations as well as non-technical stuff like why I want to contribute to this particular field.

I Know What I Did Last Summer, and I’m looking forward to doing it again. Quoting myself from FLOSS Manuals:

“Summer of Code is about much more than just code. The sheer fun of integrating with the open-source community and your mentoring organization can in fact outweigh the gratification of actual coding. “

Tags: , , , , , , , , ,

March 30, 2011

GSmolt: A GTK+ frontend for Smolt

Filed under: Blog — krkhan @ 1:46 am

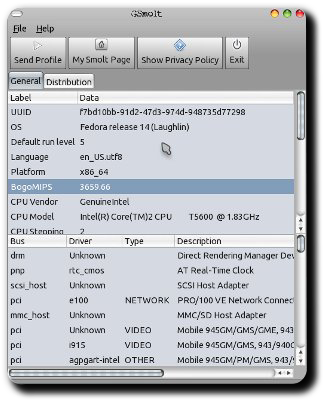
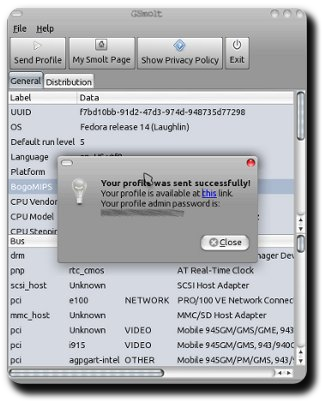
Smolt is a hardware profiler for Linux distributions which makes it easier for end-users to report back their machine configurations to a centralized database. Mike McGrath provides an excellent backend for developing Smolt GUIs which I have coupled with GTK+ for GSmolt:

GSmolt Screenshot
GSmolt Send Screenshot
(Click on the thumbnails for larger versions.)

The script can be found at the gsmolt repository on GitHub. Things on todo list include profile reporting in a separate thread and better error handling. I’ll provide RPM and Deb packages when the code is ready for a public release.

As a side note, this is the first project I have tracked using GitHub (as opposed to Launchpad + Bazaar). While Launchpad has its added advantage of PPAs which make it easier to push out public releases for Debian derivatives, I’m liking the Git experience so far. Hopefully some day Copr shall mature to a point where it can be the end-all, be-all Launchpad alternative for Fedora users.

Tags: , , , , , , , , , , ,

February 14, 2011

HOWTO: Access PSN on PS3 3.55 firmwares through Fedora

Filed under: Blog — krkhan @ 3:17 am

After a day of extensive Wireshark voyeurism I was finally able to connect to PSN on my 3.55 custom firmware through my Fedora box. This guide documents the procedure I used.

Requirements

The PC side of things:

  • Fedora 14. Any other Linux distro or even Windows machines can work, but since my primary OS is Fedora that’s what the guide shall be focusing on.
  • Internet connectivity on a separate interface than the one you’ll be connecting PS3 on. For example, my laptop connects through internet wirelessly while the PS3 is connecting to laptop through Ethernet.

The console side of things:

  • A custom firmware installed without level 2 patch. kmeaw is recommended.

Basic familiarity with Linux can be helpful. Please note that the guide requires you to mess with the flash memory of your PS3. If you aren’t paying attention you can end up with a FUBAR clinker.

Setting up the firewall

On Fedora, go to “Administration” > “Firewall” and provide the root password. In “Trusted Services”, enable the following:

DNS 53/tcp, 53/udp
DNS 53/tcp, 53/udp
Multicast DNS (mDNS) 5353/udp
Secure WWW (HTTPS) 443/tcp
WWW (HTTP) 80/tcp

In “Other Ports”, click on “Add” and select port 8888 for tcp.

Setting up a shared connection between Fedora and PS3

On Fedora:

  1. Connect to your wireless network.
  2. Right click on the Network Manager icon in the system tray and click on “Edit Connections”.
  3. Under the “Wired” tab, click on “Add”.
  4. Under the “IPv4 Settings” tab, select “Shared to other computers” as the method.
  5. Ensure that the “Connect automatically” box is checked.
  6. Click on apply.

On PS3:

  1. Under XMB, go to “Settings” > “Network Settings” > “Internet Connection Settings”.
  2. Select “Custom”.
  3. Select “Wired Connection”.
  4. Select “Auto-Detect for operation mode.
  5. Select “Automatic” for IP Address Setting.
  6. Select “Do Not Set” for DHCP host name.
  7. Select “Automatic” for DNS Setting.
  8. Select “Automatic” for MTU.
  9. Select “Do Not Use” for Proxy Server.
  10. Select “Enable” for UPnP.
  11. Connect the Ethernet cable and test the connection.

At this point, you should get the following result:

Obtain IP Address: Succeeded
Internet Connection: Succeeded
(A system software update is required. Go to [Settings] > [System Update] and perform the update.

To verify everything is working correctly, go to “System” > “Network Settings” >”Settings and Connection Status List”. You should see the following:

IP Address: 10.42.43.10
Subnet Mask: 255.255.255.0
Default Router: 10.42.43.1

Similarly, if you right click on the Network Manager icon in Fedora and click on “Connection Information”, you’ll see the following information for the shared connection:

IP Address: 10.42.43.1
Broadcast Address: 10.42.43.255
Subnet Mask: 255.255.255.0

As one last step for verification launch the Internet Browser on PS3 and see if it works.

Installing the proxy server

  1. Login as root.
    $ su -
  2. Download Charles for Linux.
    $ wget http://www.charlesproxy.com/assets//release/3.5.2/charles.tar.gz
  3. Extract the tarball:
    $ tar xvzf charles.tar.gz
  4. Change into the binary directory for Charles and add execute permissions to the launcher script:
    $ cd charles/bin/
    $ chmod a+x charles.sh
  5. Launch Charles:
    $ ./charles.sh
  6. Cancel the Firefox proxy configuration dialog. It isn’t needed for PS3.
  7. Go to “Tools” > “Proxy Settings” and ensure the HTTP Proxy is listening on port 8888.

On PS3:

  1. Launch “Settings” > “Network Settings” > “Internet Connection Settings” again.
  2. Use the same settings as before but under “Proxy Server” specify 10.42.43.1 as the address and 8888 as the port number.
  3. Test the connection. Charles should display a prompt about PS3 accessing the Internet, select “Allow”.

Just like before, ensure you can use the Internet Browse on PS3.

Finding the addresses of authorization and update servers

Restart your PS3 and try to sign in on PSN. Under the “Structure” tab in Charles you’ll see a server your console has communicated with during the process. For example, the “authentication” server is https://auth.np.ac.playstation.net:443/. In the list you’ll find the “update” server for your console (which differs from region to region). In my case, the update server was https://feu01.ps3.update.playstation.net/. Fire a console and find the IP addresses for both of these servers:

$ dig auth.np.ac.playstation.net

; <<>> DiG 9.7.2-P3-RedHat-9.7.2-5.P3.fc14 <<>> auth.np.ac.playstation.net
;; global options: +cmd
;; Got answer:
;; ->>HEADER<<- opcode: QUERY, status: NOERROR, id: 8848
;; flags: qr rd ra; QUERY: 1, ANSWER: 1, AUTHORITY: 0, ADDITIONAL: 0

;; QUESTION SECTION:
;auth.np.ac.playstation.net. IN A

;; ANSWER SECTION:
auth.np.ac.playstation.net. 2893 IN A 199.108.4.73

;; Query time: 46 msec
;; SERVER: 203.82.48.3#53(203.82.48.3)
;; WHEN: Mon Feb 14 00:45:40 2011
;; MSG SIZE rcvd: 60

$ dig feu01.ps3.update.playstation.net

; <<>> DiG 9.7.2-P3-RedHat-9.7.2-5.P3.fc14 <<>> feu01.ps3.update.playstation.net
;; global options: +cmd
;; Got answer:
;; ->>HEADER<<- opcode: QUERY, status: NOERROR, id: 16539
;; flags: qr rd ra; QUERY: 1, ANSWER: 5, AUTHORITY: 0, ADDITIONAL: 0

;; QUESTION SECTION:
;feu01.ps3.update.playstation.net. IN A

;; ANSWER SECTION:
feu01.ps3.update.playstation.net. 3600 IN CNAME a01.cdn.update.playstation.org.edgesuite.net.
a01.cdn.update.playstation.org.edgesuite.net. 54582 IN CNAME playstation.sony.akadns.net.
playstation.sony.akadns.net. 300 IN CNAME a192.d.akamai.net.
a192.d.akamai.net. 20 IN A 195.95.193.10
a192.d.akamai.net. 20 IN A 195.95.193.100

;; Query time: 952 msec
;; SERVER: 203.82.48.4#53(203.82.48.4)
;; WHEN: Mon Feb 14 00:49:07 2011
;; MSG SIZE rcvd: 203

Jot down the server names and their IP addresses:

auth.np.ac.playstation.net 199.108.4.73
feu01.ps3.update.playstation.net 195.95.193.10
195.95.193.10

Configuring the proxy server

In Charles:

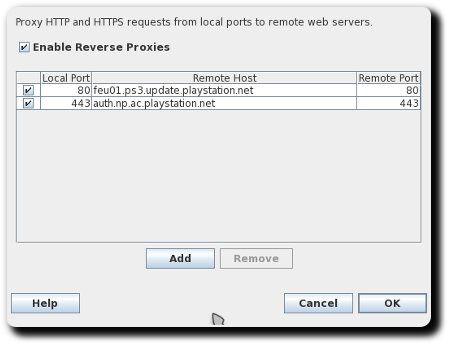
  1. Goto “Proxy” > “Reverse Proxies” and add two entries like this:

    Charles Reverse Proxies Screenshot
    (Click on the thumbnail for larger version.)

  2. Download a spoofed ps3-updatelist.txt.
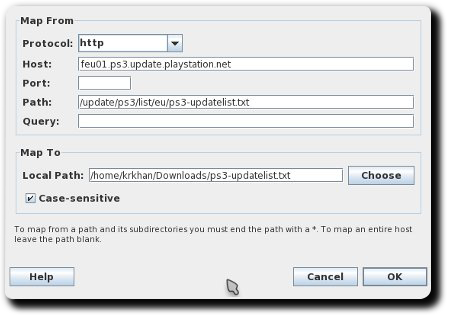
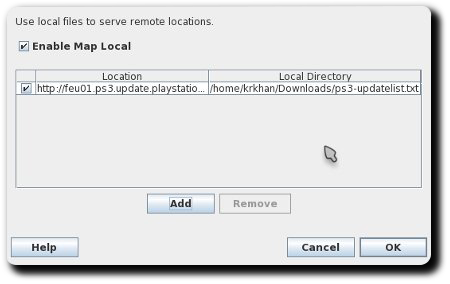
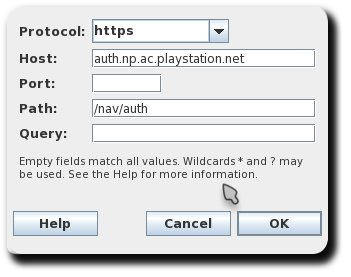
  3. Goto “Tools” > “Map Local” and add the following entry (“Local Path” should point to the ps3-updatelist.txt you downloaded in the previous step):

    Charles Map Local Add Dialog Screenshot
    Charles Map Local Screenshot
    (Click on the thumbnails for larger version.)

  4. Goto “Tools” > “Rewrite”, check “Enable Rewrite” and add a new set.
  5. Use the following settings for location:

    Charles Rewrite Add Location Screenshot

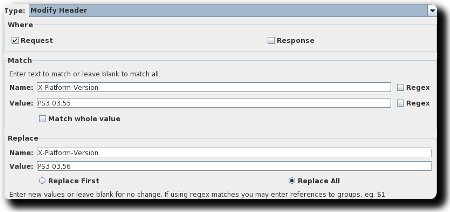
  6. And the following for rules:

    Charles Rewrite Add Rule Screenshot
    (Click on the thumbnail for larger version.)

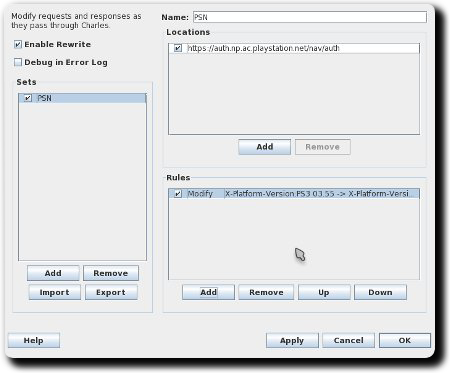
  7. The rewrite settings should now look like this:

    Charles Rewrite Screenshot
    (Click on the thumbnail for larger version.)

  8. Go to “Proxy” > “Proxy Settings” > “SSL” and add the entry auth.np.ac.playstation.net in locations table.

Rebuilding Network Manager to mask PSN IPs

This can be a PITA for Linux newbies. Network Manager uses dnsmasq but hardcodes the configuration. Leaving us without any way of affecting the shared connection’s behavior without recompiling the RPM. If people are really having trouble with this part I’ll upload the patched RPMs.

  1. Login as root:
    $ su -
  2. Install build dependencies for Network Manager:
    $ yum-builddep NetworkManager
  3. Download and install the source RPM for NetworkManager:
    $ yumdownloader --source NetworkManager
  4. Install the source RPM:
    $ rpm -ivh NetworkManager-0.8.1-10.git20100831.fc14.src.rpm

    This will create a rpmbuild directory under the home directory for root.

  5. Go to the SOURCES directory and download the patches:
    $ cd ~/rpmbuild/SOURCES/
    $ wget https://inspirated.com/uploads/nm-applet-remove-dialog-sep.patch
    $ wget https://inspirated.com/uploads/nm-psn-access.patch

    The first patch is a minor bugfix which causes compile errors. The second patche spoofs the authentication server’s IP address to 10.42.43.1 instead of 199.108.4.73. If you got a different IP address for auth.np.ac.playstation.net earlier with the dig command edit the second patch accordingly.

  6. Download and build the spec file:
    $ cd ~/rpmbuild/SPECS/
    $ wget https://inspirated.com/uploads/NetworkManager.spec
    $ rpmbuild -ba NetworkManager.spec

    If everything goes fine, the built RPMs shall appear in ~/rpmbuild/RPMS/<arch> directory.

  7. Install the RPM:
    $ cd ~/rpmbuild/RPMS/x86_64/
    $ rpm -Uvh --force NetworkManager-0.8.1-10.git20100831.fc14.x86_64.rpm
  8. Restart Network Manager:
    $ service NetworkManager restart

Installing the spoofed certificate on PS3

The spoofed certificate Charles uses to intercept SSL traffic is in the docs directory of the tarball (charles-proxy-ssl-proxying-certificate.crt). Rename it to CA02.cer, put it on a USB stick and then head over to your console.

  1. Install the AsbestOS installer and Comgenie’s Awesome Filemanager.
  2. Restart your PS3, launch the AsbestOS installer.
  3. The installer shall quit with an error about lack of level 2 access, press X to exit to XMB.
  4. Launch Comgenie’s Awesome Filemanager. You’ll see a new device called /dev_rwflash which is providing read/write support to PS3’s internal flash.
  5. Move to /dev_flash/data/cert, backup CA02.cer on your USB drive and replace it with the Charles certificate.
  6. Restart your PS3.

Gluing it all together

So far:

  • Fedora is sharing the Internet connection with PS3.
  • PS3 is using Charles as the proxy server.
  • Charles is all set to replace ps3-updatelist.txt as well as rewrite authentication headers.
  • NetworkManager is patched to mask the authentication server’s IP address to 10.42.43.1.
  • The CA02.cer certificate on PS3’s flash has been replaced by Charles’ spoofed certificate.

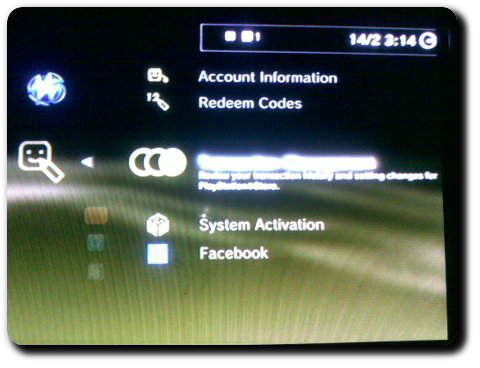
Try signing in to PSN now. You should see ps3-updatelist.txt file being mapped to the local version and 03.55 being replaced with 03.56 in the auth.np.ac.playstation.net header. If everything goes according to plan, this will be the result:

PSN SSL Trick Screenshot
(Click on the thumbnail for larger version.)

Tags: , , , , , , , , , , ,

July 18, 2010

Beta Repository for making Firefox 4 coexist peacefully with 3.6 on Fedora 13

Filed under: Blog — krkhan @ 9:45 pm

Firefox 4 offers some compelling features such as HTML 5 improvements and a new add-on manager. Since it’s quite painstaking to compile the beta from source and quite messy to place pre-compiled binaries in system default folders (not to mention the compatibility checks and upgrade chores that would interrupt at each launch if you go back and forth between different versions), I created a repository at repo.inspirated.com which can be used to test the beta version without touching any 3.6 stable release already installed on the system:

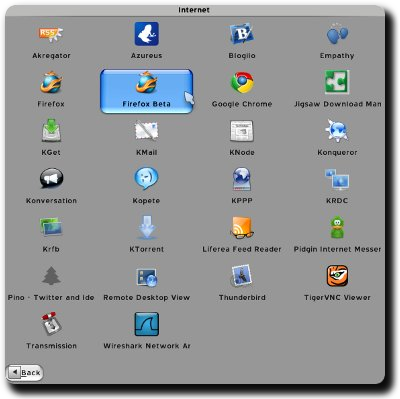
Firefox 4 Beta 1 Menu Shortcut

To use the repository, issue the following commands:

$ su -c 'wget https://repo.inspirated.com/inspirated.repo -O /etc/yum.repos.d/inspirated.repo'
$ su -c 'yum install firefox-beta'

The beta refuses to run if an instance of old Firefox is already active. Therefore, close the older Firefox and then launch the 4.0b1 version using firefox-beta command or the “Firefox Beta” shortcut in the applications menu. A new profile shall be created at ~/.mozilla/firefox/beta/ in order to leave your older profile’s settings, bookmarks and extensions etc. intact.

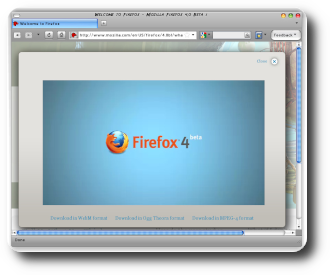
Firefox 4 Beta 1 Screenshot
(Click on the thumbnail for larger version.)

Tags: , , , , , , ,

February 21, 2010

Bookmark Undertaker v0.3 — Picking up the threads

Filed under: Blog — krkhan @ 8:09 pm

Threads are love. Threads are speed. And more often than not, threads are a consistent PITA. However, I’ve had an accidental epiphany just a few hours ago:

When in doubt When you need to communicate among threads, use synchronized Queues.”

There. This magic mantra will solve more issues in your life than you can ever imagine, and certainly more than I expected.

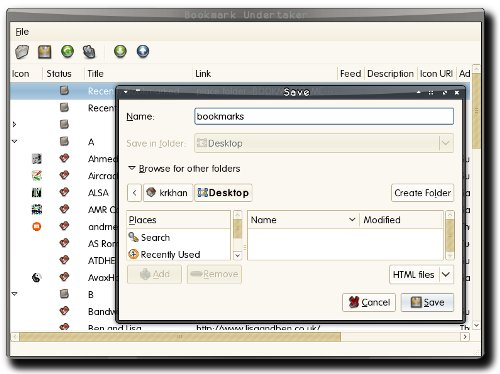
Getting back to the topic at hand, adding threading support to the program has sped up the bookmark checking process by a factor of about 435895234. Coupled with fixing of some parsing bugs, Bookmark Undertaker v0.3 is finally capable of providing a quick, stable and consistent way of sanitizing your Firefox favorites:

Boomark Undertaker v0.3 Screenshot

This time, I’ve also tried to provide Deb and RPM packages on the release page for easy installation by the Debian/Ubuntu/Fedora populace.

Ushering in the era of communist applications:

“If everyone gives one thread, the poor person will have a shirt.” — Russian Proverb

Tags: , , , , , , , , , , , , , , , ,

October 31, 2009

HOWTO: Use PyS60’s Bluetooth Console on Fedora/Ubuntu/Debian Linux

Filed under: Blog — krkhan @ 11:03 pm

While developing PyS60 apps is one of the most fun things you could do with your Nokia phone, debugging them isn’t as zippy as one would hope for in a Py development environment. To make up for that, PyS60 gives the developers an option for directly connecting to the interpreter through Bluetooth. Doesn’t sound very appealing? How about this: You connect your laptop with the cellphone, jump in at some place in the code while your app is executing and then use lappy’s big keyboard for exploiting different code and values in the interpreter. Sounds better?

To accomplish this on a Linux distro, you will need the following packages installed on your system:

Name Links
gnome-bluetooth
uucp/cu

After making sure that both are present on your system, install PyS60 on your phone if you haven’t already done so.

Now the fun part:

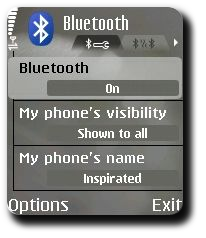
  1. Switch on Bluetooth in the cellphone.

    PyS60 Bluetooth HOWTO, Mobile screenshot #1

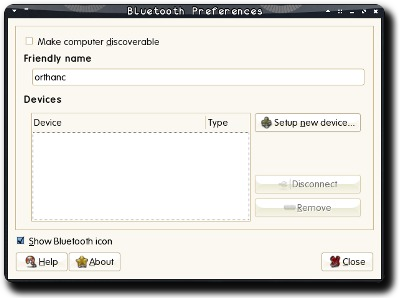
  2. Launch bluetooth-properties and click on “Setup New Device”.

    PyS60 Bluetooth HOWTO, PC screenshot #1

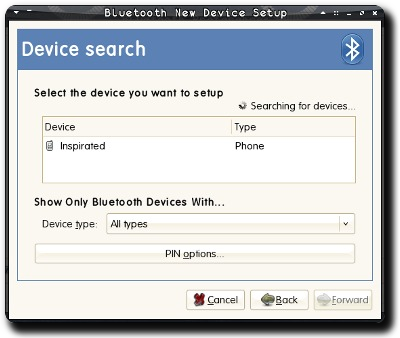
  3. Select your cellphone.

    PyS60 Bluetooth HOWTO, PC screenshot #2

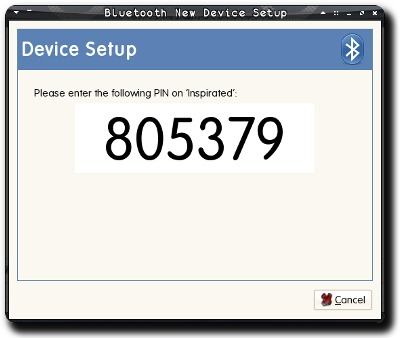
  4. You will be shown a pin.

    PyS60 Bluetooth HOWTO, PC screenshot #3

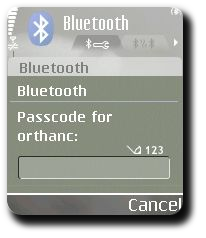
  5. Enter the pin when queried on the cellphone.

    PyS60 Bluetooth HOWTO, Mobile screenshot #2

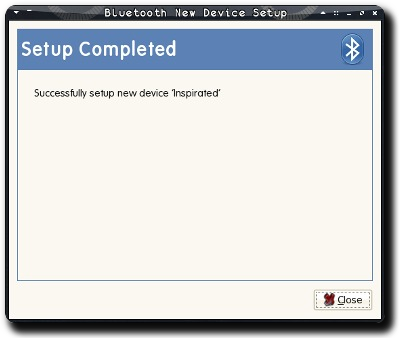
  6. The phone should be successfully paired.

    PyS60 Bluetooth HOWTO, PC screenshot #4

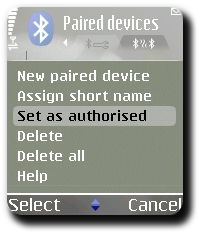
  7. Authorize your Linux system to make automatic connections to the phone.

    PyS60 Bluetooth HOWTO, Mobile screenshot #3

  8. As root, run this shell script:
    [root@orthanc ~]# ./rfcomm-listen.sh

    Serial Port service registered
    Waiting for connection on channel 2

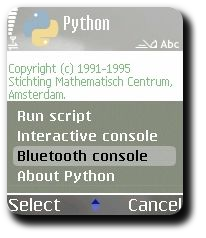
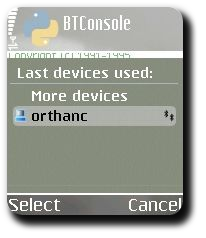
  9. Launch PyS60 interpreter and select “Bluetooth Console” from the application menu.

    PyS60 Bluetooth HOWTO, Mobile screenshot #4

  10. Select your Linux machine.

    PyS60 Bluetooth HOWTO, Mobile screenshot #5

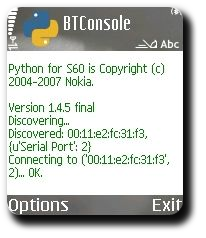
    The command you ran in previous step should have new output:

    [root@orthanc ~]# ./rfcomm-listen.sh

    Serial Port service registered
    Waiting for connection on channel 2
    Connection from 00:17:4B:B6:35:31 to /dev/rfcomm0
    Press CTRL-C for hangup

    The cellphone screen should be showing something like this:

    PyS60 Bluetooth HOWTO, Mobile screenshot #6

  11. As root again, open a new terminal and run:
    [root@orthanc ~]# cu -l /dev/rfcomm0

    Connected.

  12. Hit Enter till prompt (>>>) appears, then type:

    >>> import appuifw
    >>> appuifw.query(u'Hello World', 'text')

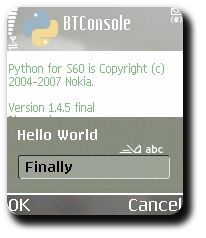
  13. Viola, you should have an input box on the mobile screen:

    PyS60 Bluetooth HOWTO, Mobile screenshot #7

  14. Enter any text and press the OK key. It should be show up in the terminal you were using to type in code:

    >>> import appuifw
    >>> appuifw.query(u'Hello World', 'text')
    u’Finally’

  15. Exit the interpreter by typing CTRL+D on an empty line:

    >>> import appuifw
    >>> appuifw.query(u'Hello World', 'text')
    u’Finally’
    >>>
    Interactive interpreter finished.
    cu: Got hangup signal

    Disconnected.

Pat yourself on the back. Now, you can use your Bluetooth console to import your modules, execute some stuff and then jump in the middle to test some extra lines or values. In fact, I found it to be a pretty darned good way of learning about PyS60’s API. Res secundae!

Tags: , , , , , , , , , , , , , , , ,

August 18, 2009

Fedora Software Patents FAQ

Filed under: Blog — krkhan @ 8:48 pm

Going through the Planet Fedora feed, I spotted this excellent write-up which tries to explain Fedora-related patent questions such as “why the $*#@ won’t Red Hat give us MP3 playback support“. I would be straight-down lying if I said that the article offered nothing new to me. In fact, some answers, such as this one … :

Patent licenses are usually granted via payment of royalty based on the number of users. Since Fedora is free and open source software, the effective number of users is essentially unrestricted. Patent holders are generally unwilling to give a blanket patent license for unlimited use, and the royalty payments for these licenses would be too high to purchase them outright. Proprietary operating systems like Microsoft Windows include the cost of the patent license as part of the product being sold to the end users. Fedora is not sold commercially, so there is no way to recoup these substantial expenses. Even assuming funds are available to do so, licenses such as the GPL require a written patent grant (in regions where software patents are enforced) compatible with royalty free distribution and modification. Since meeting this requirement effectively nullifies the effect of a patent, patent holders are also generally unwilling to do this.

… clarified in my mind a few long-held confusions about Fedora’s reluctance regarding patent infringement. For the general user, RPM Fusion works around all that crap; but a read of the linked FAQ is recommended nevertheless for having an idea about the issues inherently involved with seemingly simple tasks such as playing DVDs.

Tags: , , , ,

June 27, 2009

The highs and lows of Leonidas — This. Is. Fedora!

Filed under: Blog — krkhan @ 12:43 am

There is a reason why I never evangelize Fedora much: it’s far from perfect. There is also a reason why I use Fedora for my everyday Linux-ing: it’s good when it starts working. The two seemingly conflicting viewpoints are not mutually exclusive, since Fedora’s instability as well as its appeal can be termed in one word: bleeding-edge.

The biannual cycle of backup-reinstall-reconfigure for each new Fedora release works fine for me. It takes a day or two to get everything back to the way want them to be, but the trade-off is almost always worth it. Consider this, upgrading from a Fedora version to the next will almost never work seamlessly. Nevertheless, the re-installation mantra allowed me to use PulseAudio’s “perfect” setup much before most of the other distros’ users. The fact that I got a clean start for the new sound architecture also explains why I never had any incompatibility issues with it and consequently, my status as one of its huge fans.

Another reason why I’m still hanging on to Fedora is because of the familiarity factor, as I no longer have the ample time for trying out newer distributions just for the sake of it. Linux From Scratch was a mighty fun experience, but keeping it up-to-date was nothing short of a Herculean task. Gentoo sounds very appealing, but I don’t want to download a DVD, go through the hassle of installing and getting familiar with the new distro and then emerge a whole universe of updates on an internet connection as reliable as Fedora on Hurd. The perfect solution would be to install a new release of Gentoo but unfortunately, it’s been over an year now since I started waiting for one.

Which brings us to Fedora 11 — lovingly nicknamed after everyone’s favorite Spartan king.

The predominant aspects of the new release which affect me as a user are the Ext4 filesystem and the Kernel Modesetting feature. So far, I am not even using the former. Yes, yes, I know I bragged about bleeding-edge before, but let me explain why I did not go for it in this particular case:

  • Filesystem is the most critical aspect of a system for me. I can toy around and experiment with everything but this holy grail. If my audio fails, I can try fixing it. If X stops working, ditto. If my data is corrupted, I’m FUBAR.
  • Anaconda crashed when I tried to update the boot-loader configuration for a system with Ext4 partitions.
  • I couldn’t find a way to use Ext4 without using the Logical Volume Manager. I like my partitions as /dev/sdaX and entries such as /dev/mapper/yourmom/blahblahblah/finallythedrive in the fstab file turn me off.

Nevertheless, KMS made up for the Ext4 — or lack thereof.

  • Booting is now prettier.
  • Working in runlevel 3 is so much more efficient because of all the extra space provided by higher resolution.
  • Switching virtual terminals and X sessions is a breeze.
  • Suspend/Resume is a bit more stable.

Other significant changes include Xfce 4.6, Firefox 3.5 and the reworked volume management in Pulse. Overall, I’m pretty satisfied with my decision to upgrade, and here’s to the hoping that the next 6 months will go as smooth as the previous ones.

Tags: , , , , , ,

March 19, 2009

Video: The Centenary Rant — X11tasy

Filed under: Blog — krkhan @ 7:10 pm

The 100th post, and considering that the most popular ones on the blog so far have been screencasts, there wouldn’t have been a better way to commemorate the occasion than editing a short music-video which would demonstrate the prowess of Linux on desktop.

Tags: , , , , , , , , , ,

March 15, 2009

HOWTO: Use USB devices in Virtual Machine Manager with QEMU

Filed under: Blog — krkhan @ 3:09 pm

Every once a while, I need to take the backup of my Nokia N72 using PC Suite. Since the task had to be performed on Windows, I expected my virtualized machine to be able to do so. Unfortunately, Virtual Machine Manager does not provide any option in its interface which would allow me to use my USB devices in virtualized machines. Going through the documentation though, here’s the method through which I was able to solve my issue.

First of all, you should have the vendor and product ID’s of the USB device you want to use. Sounds alien? Use the command:

[user@host ~]$ lsusb

Which will show you something like:

Bus 001 Device 001: ID 1d6b:0002 Linux Foundation 2.0 root hub
Bus 005 Device 001: ID 1d6b:0001 Linux Foundation 1.1 root hub
Bus 004 Device 002: ID 0a12:0001 Cambridge Silicon Radio, Ltd Bluetooth Dongle (HCI mode)
Bus 004 Device 001: ID 1d6b:0001 Linux Foundation 1.1 root hub
Bus 003 Device 003: ID 0421:04c4 Nokia Mobile Phones
Bus 003 Device 002: ID 09da:000a A4 Tech Co., Ltd Port Mouse
Bus 003 Device 001: ID 1d6b:0001 Linux Foundation 1.1 root hub
Bus 002 Device 001: ID 1d6b:0001 Linux Foundation 1.1 root hub

The bold numbers in the line containing “Nokia Mobile Phones” are the vendor and product IDs respectively. Once you’ve noted them down for your required device (in my case: 0x421 and 0x4c4), list the virtual machines’ configuration files:

[user@host ~]$ sudo ls /etc/libvirt/qemu

networks windoze.xml

My virtual machine was named “windoze”, so windoze.xml is the file that I need to edit:

[user@host ~]$ sudo gedit /etc/libvirt/qemu/windoze.xml

In the editor, add the highlighted hostdev lines under the devices section (replacing the vendor and product IDs with the ones noted down from lsusb output):

<devices>
<emulator>/usr/bin/qemu-kvm</emulator>
<hostdev mode='subsystem' type='usb'>
<source>
<vendor id='0x0421' />
<product id='0x04c4' />
</source>
</hostdev>

Save and close the file. Restart the service:

[user@host ~]$ sudo service libvirtd restart

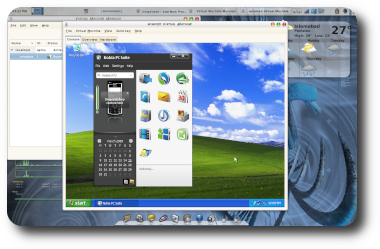
If everything went smoothly, the USB device should now be accessible from within the virtual machine:

Screenshot of Nokia PC Suite connected to a USB device in virtualized Windows
(Click on the thumbnail for larger version.)

Tags: , , , , , , , , , , , ,
Next Page »