

HOWTO: Access PSN on PS3 3.55 firmwares through Fedora
After a day of extensive Wireshark voyeurism I was finally able to connect to PSN on my 3.55 custom firmware through my Fedora box. This guide documents the procedure I used.
Requirements
The PC side of things:
- Fedora 14. Any other Linux distro or even Windows machines can work, but since my primary OS is Fedora that’s what the guide shall be focusing on.
- Internet connectivity on a separate interface than the one you’ll be connecting PS3 on. For example, my laptop connects through internet wirelessly while the PS3 is connecting to laptop through Ethernet.
The console side of things:
- A custom firmware installed without level 2 patch. kmeaw is recommended.
Basic familiarity with Linux can be helpful. Please note that the guide requires you to mess with the flash memory of your PS3. If you aren’t paying attention you can end up with a FUBAR clinker.
Setting up the firewall
On Fedora, go to “Administration” > “Firewall” and provide the root password. In “Trusted Services”, enable the following:
| DNS | 53/tcp, 53/udp | ||
| DNS | 53/tcp, 53/udp | ||
| Multicast DNS (mDNS) | 5353/udp | ||
| Secure WWW (HTTPS) | 443/tcp | ||
| WWW (HTTP) | 80/tcp |
In “Other Ports”, click on “Add” and select port 8888 for tcp.
Setting up a shared connection between Fedora and PS3
On Fedora:
- Connect to your wireless network.
- Right click on the Network Manager icon in the system tray and click on “Edit Connections”.
- Under the “Wired” tab, click on “Add”.
- Under the “IPv4 Settings” tab, select “Shared to other computers” as the method.
- Ensure that the “Connect automatically” box is checked.
- Click on apply.
On PS3:
- Under XMB, go to “Settings” > “Network Settings” > “Internet Connection Settings”.
- Select “Custom”.
- Select “Wired Connection”.
- Select “Auto-Detect for operation mode.
- Select “Automatic” for IP Address Setting.
- Select “Do Not Set” for DHCP host name.
- Select “Automatic” for DNS Setting.
- Select “Automatic” for MTU.
- Select “Do Not Use” for Proxy Server.
- Select “Enable” for UPnP.
- Connect the Ethernet cable and test the connection.
At this point, you should get the following result:
Obtain IP Address: Succeeded
Internet Connection: Succeeded
(A system software update is required. Go to [Settings] > [System Update] and perform the update.
To verify everything is working correctly, go to “System” > “Network Settings” >”Settings and Connection Status List”. You should see the following:
IP Address: 10.42.43.10
Subnet Mask: 255.255.255.0
Default Router: 10.42.43.1
Similarly, if you right click on the Network Manager icon in Fedora and click on “Connection Information”, you’ll see the following information for the shared connection:
IP Address: 10.42.43.1
Broadcast Address: 10.42.43.255
Subnet Mask: 255.255.255.0
As one last step for verification launch the Internet Browser on PS3 and see if it works.
Installing the proxy server
- Login as root.
$ su -
- Download Charles for Linux.
$ wget http://www.charlesproxy.com/assets//release/3.5.2/charles.tar.gz
- Extract the tarball:
$ tar xvzf charles.tar.gz
- Change into the binary directory for Charles and add execute permissions to the launcher script:
$ cd charles/bin/
$ chmod a+x charles.sh
- Launch Charles:
$ ./charles.sh
- Cancel the Firefox proxy configuration dialog. It isn’t needed for PS3.
- Go to “Tools” > “Proxy Settings” and ensure the HTTP Proxy is listening on port 8888.
On PS3:
- Launch “Settings” > “Network Settings” > “Internet Connection Settings” again.
- Use the same settings as before but under “Proxy Server” specify 10.42.43.1 as the address and 8888 as the port number.
- Test the connection. Charles should display a prompt about PS3 accessing the Internet, select “Allow”.
Just like before, ensure you can use the Internet Browse on PS3.
Finding the addresses of authorization and update servers
Restart your PS3 and try to sign in on PSN. Under the “Structure” tab in Charles you’ll see a server your console has communicated with during the process. For example, the “authentication” server is https://auth.np.ac.playstation.net:443/. In the list you’ll find the “update” server for your console (which differs from region to region). In my case, the update server was https://feu01.ps3.update.playstation.net/. Fire a console and find the IP addresses for both of these servers:
$ dig auth.np.ac.playstation.net |
; <<>> DiG 9.7.2-P3-RedHat-9.7.2-5.P3.fc14 <<>> auth.np.ac.playstation.net
;; global options: +cmd
;; Got answer:
;; ->>HEADER<<- opcode: QUERY, status: NOERROR, id: 8848
;; flags: qr rd ra; QUERY: 1, ANSWER: 1, AUTHORITY: 0, ADDITIONAL: 0;; QUESTION SECTION:
;auth.np.ac.playstation.net. IN A;; ANSWER SECTION:
auth.np.ac.playstation.net. 2893 IN A 199.108.4.73;; Query time: 46 msec
;; SERVER: 203.82.48.3#53(203.82.48.3)
;; WHEN: Mon Feb 14 00:45:40 2011
;; MSG SIZE rcvd: 60
$ dig feu01.ps3.update.playstation.net |
; <<>> DiG 9.7.2-P3-RedHat-9.7.2-5.P3.fc14 <<>> feu01.ps3.update.playstation.net
;; global options: +cmd
;; Got answer:
;; ->>HEADER<<- opcode: QUERY, status: NOERROR, id: 16539
;; flags: qr rd ra; QUERY: 1, ANSWER: 5, AUTHORITY: 0, ADDITIONAL: 0;; QUESTION SECTION:
;feu01.ps3.update.playstation.net. IN A;; ANSWER SECTION:
feu01.ps3.update.playstation.net. 3600 IN CNAME a01.cdn.update.playstation.org.edgesuite.net.
a01.cdn.update.playstation.org.edgesuite.net. 54582 IN CNAME playstation.sony.akadns.net.
playstation.sony.akadns.net. 300 IN CNAME a192.d.akamai.net.
a192.d.akamai.net. 20 IN A 195.95.193.10
a192.d.akamai.net. 20 IN A 195.95.193.100;; Query time: 952 msec
;; SERVER: 203.82.48.4#53(203.82.48.4)
;; WHEN: Mon Feb 14 00:49:07 2011
;; MSG SIZE rcvd: 203
Jot down the server names and their IP addresses:
| auth.np.ac.playstation.net | 199.108.4.73 | ||
| feu01.ps3.update.playstation.net |
195.95.193.10 195.95.193.10 |
Configuring the proxy server
In Charles:
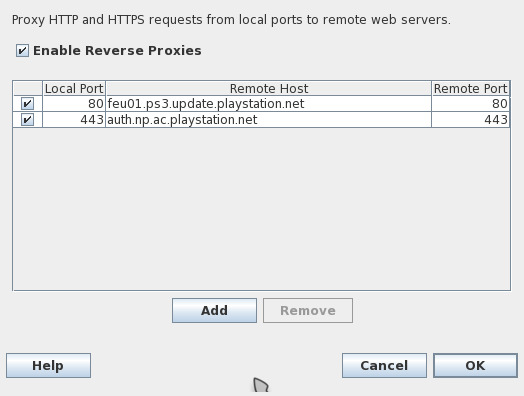
- Goto “Proxy” > “Reverse Proxies” and add two entries like this:
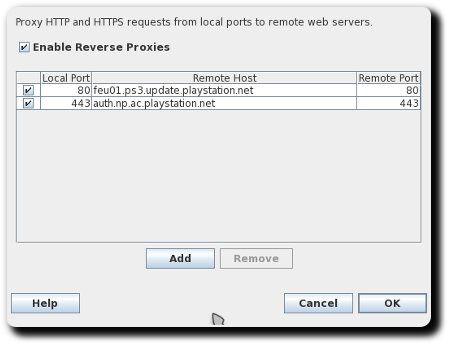
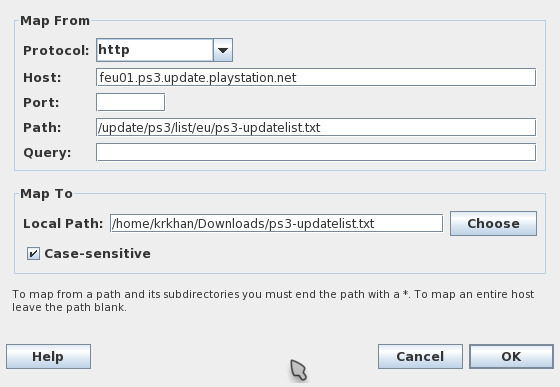
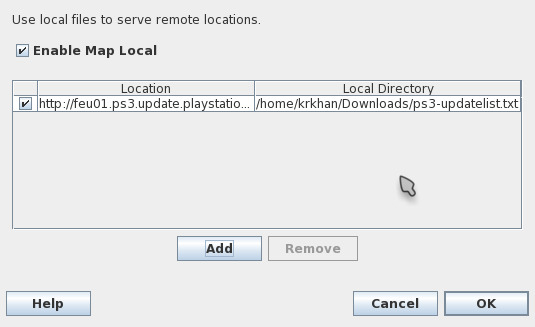
(Click on the thumbnail for larger version.) - Download a spoofed ps3-updatelist.txt.
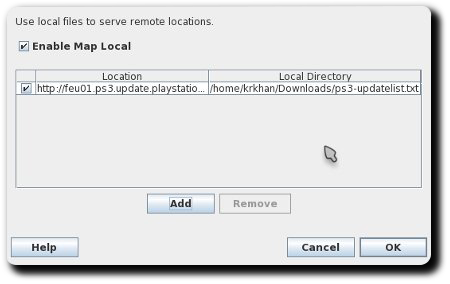
- Goto “Tools” > “Map Local” and add the following entry (“Local Path” should point to the
ps3-updatelist.txtyou downloaded in the previous step):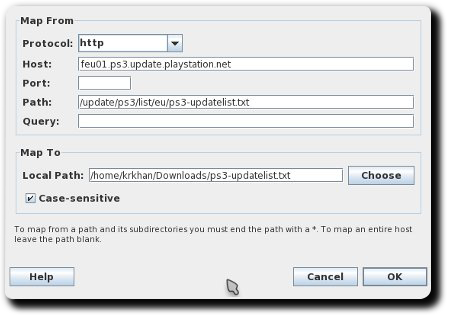
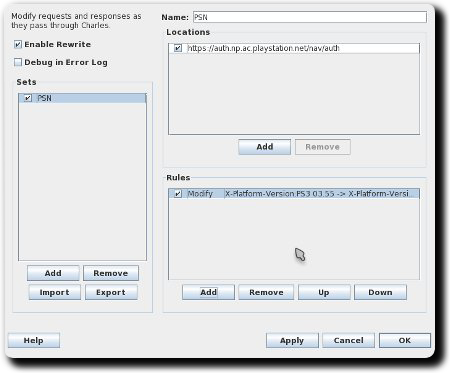
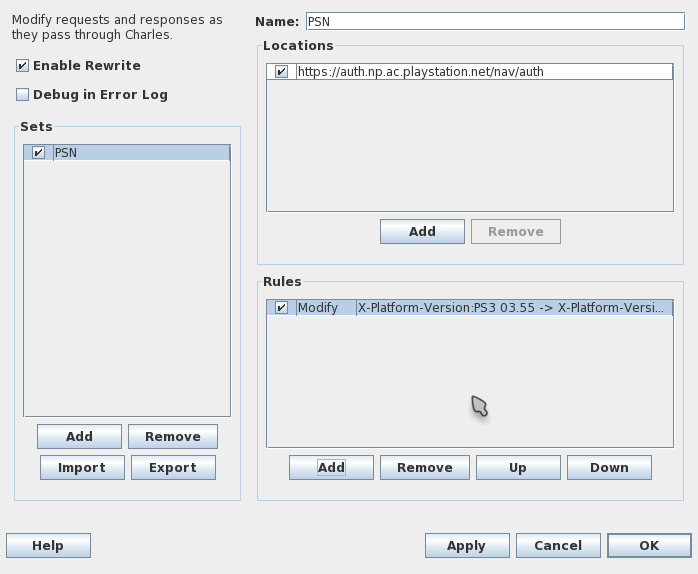
(Click on the thumbnails for larger version.) - Goto “Tools” > “Rewrite”, check “Enable Rewrite” and add a new set.
- Use the following settings for location:
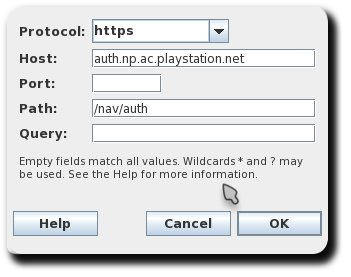
- And the following for rules:
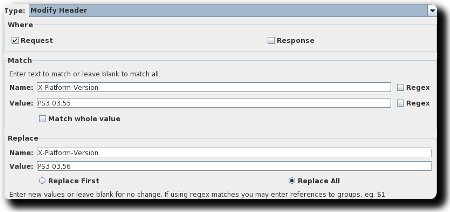
(Click on the thumbnail for larger version.) - The rewrite settings should now look like this:
(Click on the thumbnail for larger version.) - Go to “Proxy” > “Proxy Settings” > “SSL” and add the entry
auth.np.ac.playstation.netin locations table.

Rebuilding Network Manager to mask PSN IPs
This can be a PITA for Linux newbies. Network Manager uses dnsmasq but hardcodes the configuration. Leaving us without any way of affecting the shared connection’s behavior without recompiling the RPM. If people are really having trouble with this part I’ll upload the patched RPMs.
- Login as root:
$ su -
- Install build dependencies for Network Manager:
$ yum-builddep NetworkManager - Download and install the source RPM for NetworkManager:
$ yumdownloader --source NetworkManager
- Install the source RPM:
$ rpm -ivh NetworkManager-0.8.1-10.git20100831.fc14.src.rpm
This will create a
rpmbuilddirectory under the home directory for root. - Go to the
SOURCESdirectory and download the patches:$ cd ~/rpmbuild/SOURCES/ $ wget https://inspirated.com/uploads/nm-applet-remove-dialog-sep.patch $ wget https://inspirated.com/uploads/nm-psn-access.patch
The first patch is a minor bugfix which causes compile errors. The second patche spoofs the authentication server’s IP address to 10.42.43.1 instead of 199.108.4.73. If you got a different IP address for
auth.np.ac.playstation.netearlier with thedigcommand edit the second patch accordingly. - Download and build the spec file:
$ cd ~/rpmbuild/SPECS/
$ wget https://inspirated.com/uploads/NetworkManager.spec
$ rpmbuild -ba NetworkManager.spec
If everything goes fine, the built RPMs shall appear in
~/rpmbuild/RPMS/<arch>directory. - Install the RPM:
$ cd ~/rpmbuild/RPMS/x86_64/
$ rpm -Uvh --force NetworkManager-0.8.1-10.git20100831.fc14.x86_64.rpm
- Restart Network Manager:
$ service NetworkManager restart
Installing the spoofed certificate on PS3
The spoofed certificate Charles uses to intercept SSL traffic is in the docs directory of the tarball (charles-proxy-ssl-proxying-certificate.crt). Rename it to CA02.cer, put it on a USB stick and then head over to your console.
- Install the AsbestOS installer and Comgenie’s Awesome Filemanager.
- Restart your PS3, launch the AsbestOS installer.
- The installer shall quit with an error about lack of level 2 access, press X to exit to XMB.
- Launch Comgenie’s Awesome Filemanager. You’ll see a new device called
/dev_rwflashwhich is providing read/write support to PS3’s internal flash. - Move to
/dev_flash/data/cert, backupCA02.ceron your USB drive and replace it with the Charles certificate. - Restart your PS3.
Gluing it all together
So far:
- Fedora is sharing the Internet connection with PS3.
- PS3 is using Charles as the proxy server.
- Charles is all set to replace
ps3-updatelist.txtas well as rewrite authentication headers. - NetworkManager is patched to mask the authentication server’s IP address to 10.42.43.1.
- The
CA02.cercertificate on PS3’s flash has been replaced by Charles’ spoofed certificate.
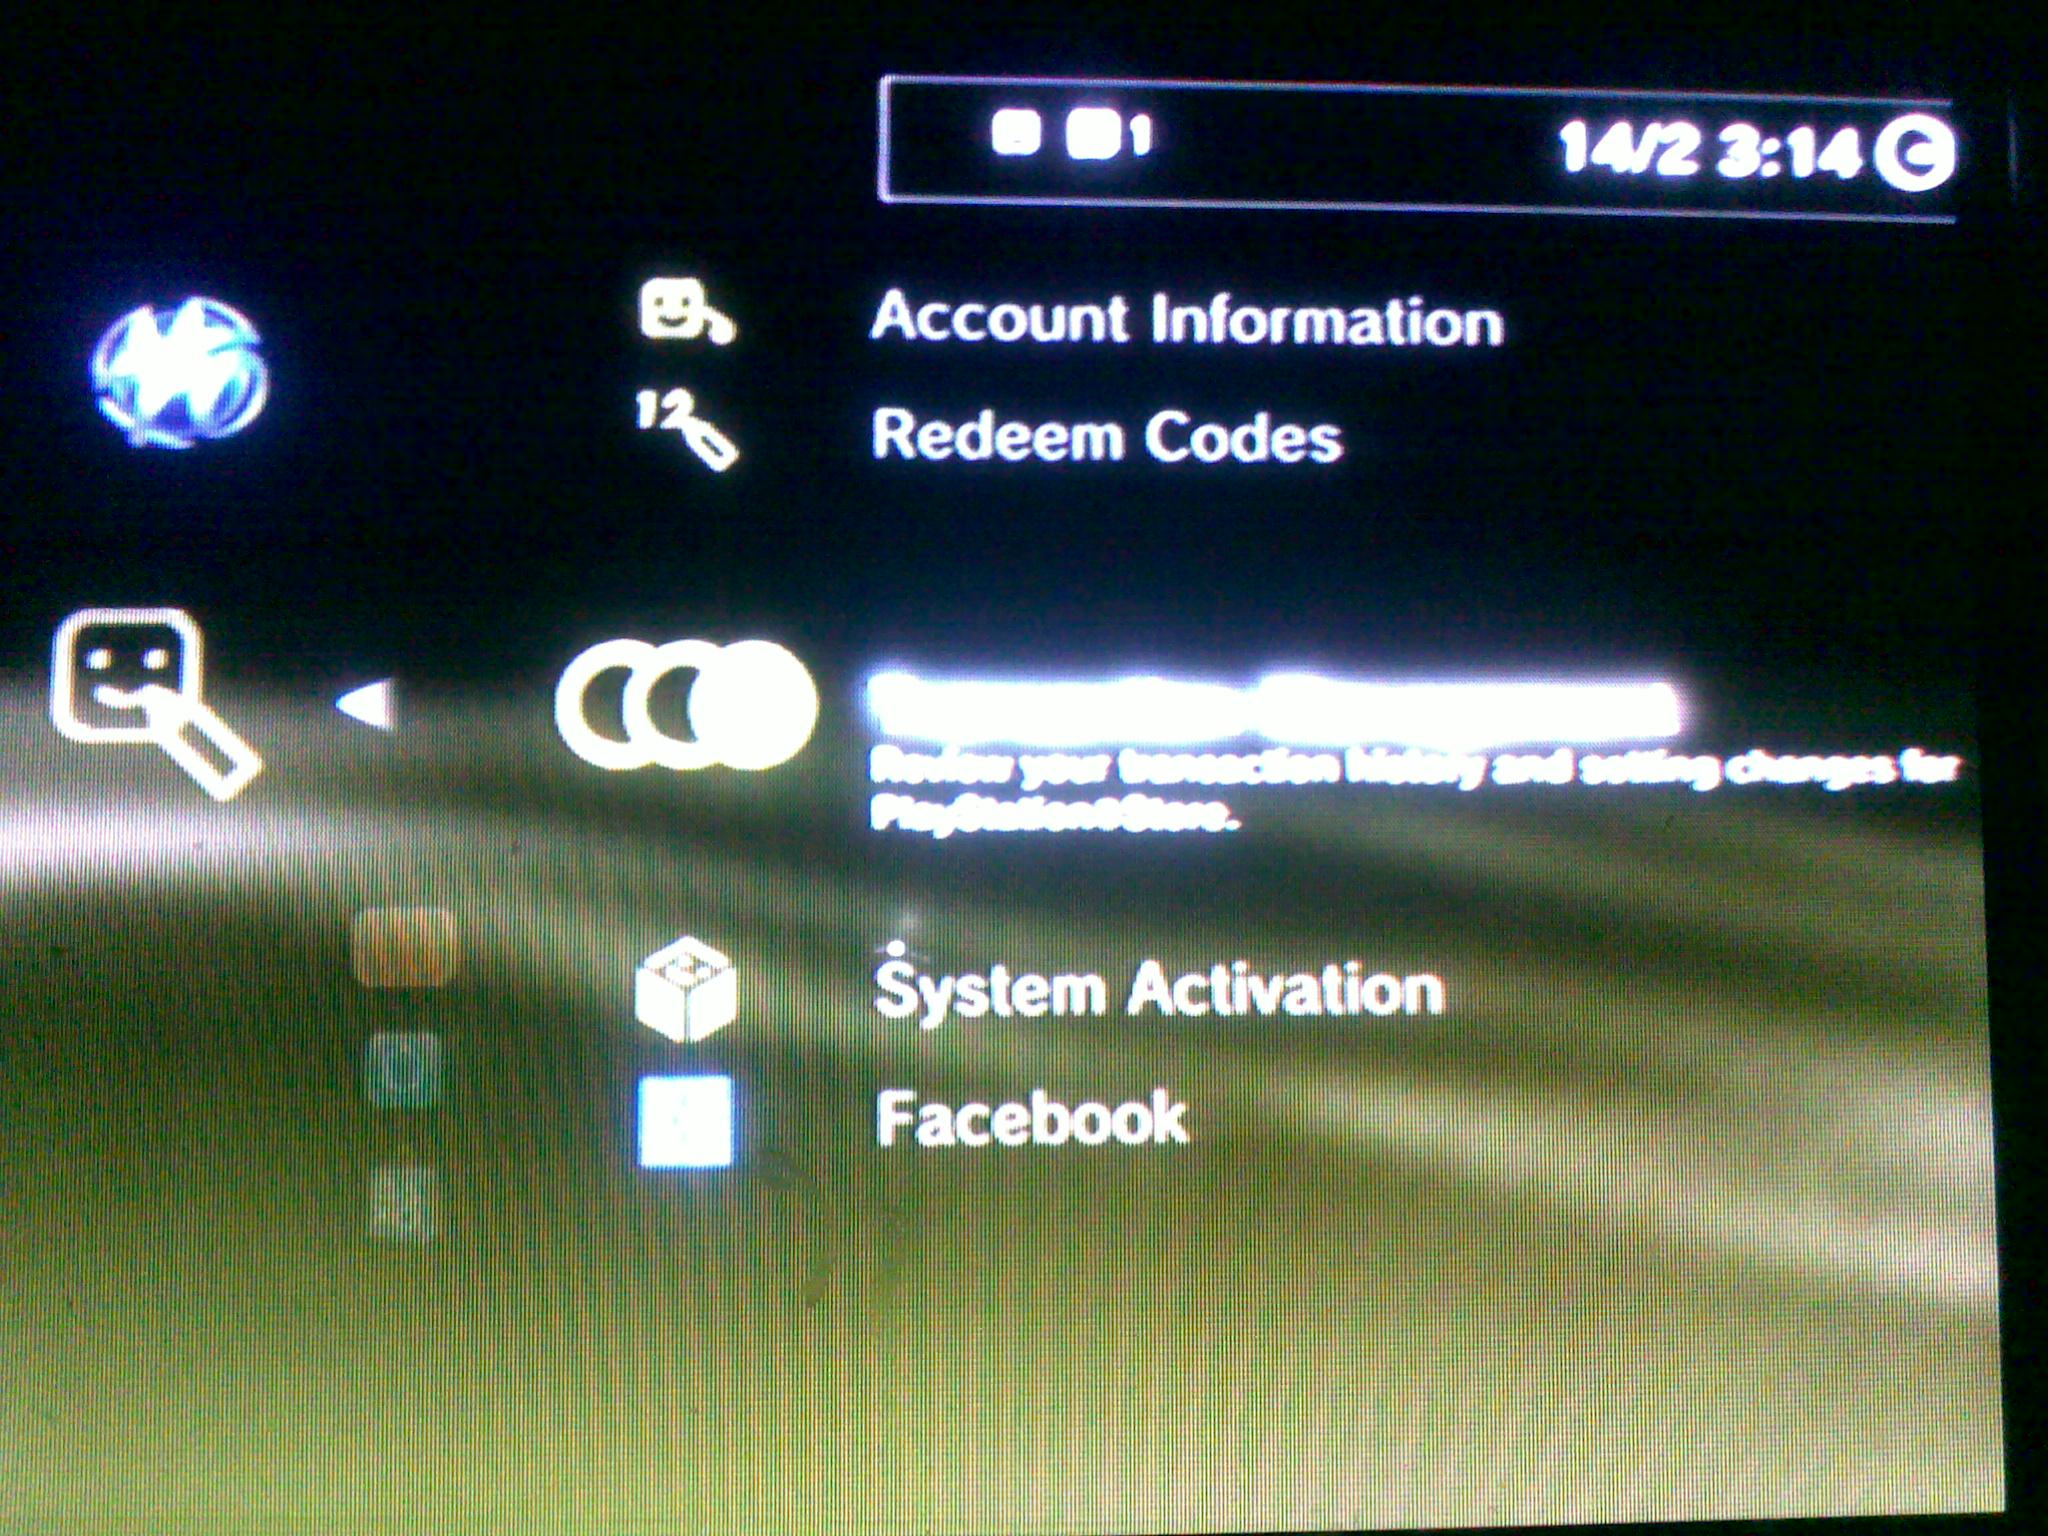
Try signing in to PSN now. You should see ps3-updatelist.txt file being mapped to the local version and 03.55 being replaced with 03.56 in the auth.np.ac.playstation.net header. If everything goes according to plan, this will be the result:
(Click on the thumbnail for larger version.)
