Inspirated


November 17, 2010

HOWTO: Use animated XScreenSaver matrix backgrounds with Xfce

Filed under: Blog — krkhan @ 7:13 pm

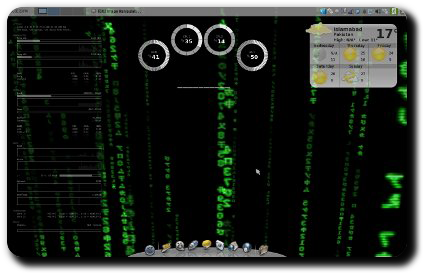
Screensavers like glmatrix have long been used by *nixers to woo people by showing them customizable animations as desktop wallpapers. Users of desktop environments such as Xfce have to however use xwininfo to determine and use the window IDs of their desktops (as the “-root” option stops working when the root window is overlayed by respective desktop managers e.g., Xfdesktop). For those who want to automate the startup process of XScreenSaver wallpapers in such environments, here’s a quick command you can use:

$ /usr/libexec/xscreensaver/glmatrix -window-id $(xwininfo -name "Desktop" | grep 'Window id' | sed 's/.*\(0x[0-9a-z]*\).*/\1/g')

Results:

Xfce Matrix Screenshot #1
Xfce Matrix Screenshot #2
(Click on the thumbnails for larger versions.)

Tags: , , , , , ,

June 5, 2010

HOWTO: Find interesting dictionary words with your Linux box

Filed under: Blog — krkhan @ 4:24 pm

Few *nix users are aware of existence of one /usr/share/dict/words on their machines. The original purpose of this file was to assist Unix programs in spell-checking. Now that every program that supports typo-prevention includes its own dictionaries, the words file no longer fares as something significant in the geek universe.

Nevertheless, the nifty gem can still serve as a fun place to find or coin new words based on lexicographical constraints. The omnipresent egrep command can be used to exploit the power of regular expressions against the English dictionary. Here’s how:

  • Find all words containing 6 or more characters which don’t contain any vowel, dot or dash:
    -bash-$ egrep -i '^[^aeiou.-]{6,}$' /usr/share/dict/words

    bkbndr
    BSDHyg
    BSFMgt
    BSGMgt
    BSPhTh
    crwths
    crypts
    Cynthy
    Cynwyd
    cywydd
    flybys
    Flysch
    flysch
    ftncmd
    ghylls
    glycyl
    glycyls
    glyphs
    gypsyfy
    gypsyry
    Khlyst
    Khlysts
    Khlysty
    Kylynn
    kyschty
    lymphs
    lymphy
    Lynndyl
    MSGMgt
    mtscmd
    myrrhs
    myrrhy
    Myrvyn
    Myrwyn
    nymphly
    nymphs
    pgnttrp
    Phyllys
    Phylys
    phytyl
    psychs
    pyrryl
    rhythm
    rhythms
    Schwyz
    spryly
    SSTTSS
    stddmp
    strych
    styryl
    sylphs
    sylphy
    symphysy
    synchs
    synths
    syzygy
    thymyl
    trysts
    tsktsk
    tsktsks
    tyddyn
    vyrnwy
    why’ll
    Wrycht
    WWMCCS
    xylyls

  • Find all words containing exactly 4 characters which can be spelled in pure Hexspeak, e.g., 0xDEADBEEF or 0xBABEFACE:
    -bash-$ egrep -i '^[abcdef]{4}$' /usr/share/dict/words

    AAAA
    AAEE
    abac
    Abad
    Abba
    abba
    Abbe
    abbe
    abed
    ACAA
    acad
    acca
    acce
    ACDA
    aced
    Adad
    adad
    Adda
    adda
    Adee
    AFCC
    affa
    Baba
    baba
    Babb
    Babe
    babe
    BAcc
    Badb
    bade
    BAEd
    baff
    bead
    Bebe
    Bede
    bede
    Beeb
    beef
    BFDC
    caba
    Cabe
    Caca
    caca
    cace
    CADD
    Cade
    cade
    CAFE
    cafe
    caff
    CDCF
    ceca
    Cece
    cede
    CFCA
    dabb
    Dace
    dace
    Dada
    dada
    Dade
    dade
    daff
    DBAC
    dead
    deaf
    debe
    decd
    deda
    dedd
    Dede
    deed
    Eada
    Eade
    EAFB
    Ebba
    ebcd
    ECAD
    ecad
    Ecca
    ecce
    EDAC
    Edda
    edda
    Edea
    edea
    Edee
    Faba
    Fabe
    FACD
    face
    fade
    faff
    FEAF
    Febe
    feeb
    feed
    feff

  • Find all words which contain ‘H’, ‘T’, ‘M’ and ‘L’ in precisely that order:
    egrep -i '^h.*t.*m.*l$' /usr/share/dict/words

    haemathermal
    haematothermal
    hemathermal
    hematothermal
    hepatoumbilical
    hephthemimeral
    heptametrical
    heteroecismal
    heteromeral
    heterothermal
    hexahydrothymol
    hippotomical
    histochemical
    histomorphological
    homeothermal
    homoiothermal
    homothermal
    hydrothermal
    hygrothermal
    hyperrhythmical
    hypersentimental
    hyperthermal
    hypertridimensional
    hypostomial
    hypothermal
    hysteromaniacal

  • Find all words containing ‘s’, ‘e’ and ‘x’ but at least one different character between each of them:
    -bash-$ egrep -i '^.*s[^sex]+e[^sex]+x.*$' /usr/share/dict/words

    antispermotoxin
    asterixis
    Asteroxylaceae
    Asteroxylon
    Cristineaux
    Erysipelothrix
    erysipelothrix
    Herstmonceux
    Hurstmonceux
    inspectrix
    Issy-les-Molineux
    Lisieux
    mesoappendix
    obstetrix
    pressure-fixing
    proces-verbaux
    salenixon
    salpingemphraxis
    salteaux
    saucebox
    sauceboxes
    sceuophylax
    scleronyxis
    scleroticonyxis
    scleroxanthin
    she-fox
    side-box
    sidebox
    Sideroxylon
    single-tax
    skeptophylaxia
    skeptophylaxis
    slipper-foxed
    smokebox
    sneakbox
    sore-pressedsore-taxed
    sore-taxed
    spectatrix
    speculatrix
    spermatoxin
    spermotoxin
    sphacelotoxin
    sphenomaxillary
    spice-box
    splanchnemphraxis
    splenauxe
    splenotoxin
    state-taxed
    stenothorax
    sternomaxillary
    sternoxiphoid
    stone-axe
    Streptothrix
    subbureaux
    sulfadimethoxine
    superaxillary
    superfix
    superfixes
    superflux
    supergalaxies
    supergalaxy
    superluxurious
    superluxuriously
    superluxuriousness
    supermaxilla
    supermaxillary
    supermixture
    superoxalate
    superoxide
    superoxygenate
    superoxygenated
    superoxygenating
    superoxygenation
    supertax
    supertaxation
    supertaxes
    sweatbox
    sweatboxes
    swine-pox
    swinepox
    swinepoxes
    Thrsieux

Now you can name your start-up company “SupErfiX” and hope that it will someday be acquired by Microsoft.

Tags: , , , , ,

March 8, 2010

Using overlays for source code listings in LaTeX Beamer

Filed under: Blog — krkhan @ 9:33 pm

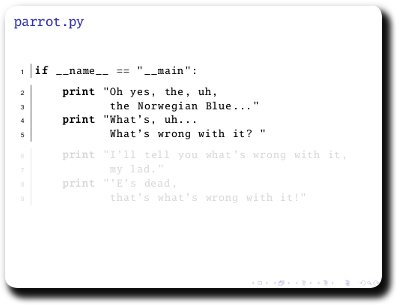
The standard way of including source code listings in Beamer is to use the semiverbatim environment. Needless to say, it does not provide all the syntax highlighting and line-numbering love of the listings package. Combine the two and you have something pretty as well as extremely helpful in delivering presentations which have code:

1
2
3
4
5
6
7
8
9
10
11
12
13
14
15
16
17
18
19
20
21
22
23
24
25
26
27
28
29
30
31
32
33
34
35
36
37
38
39
40
41
42
43
44
45
46
47
\documentclass{beamer}
 
\setbeamercovered{transparent}
 
\usepackage{pxfonts}
\usepackage{listings}
 
\begin{document}
 
\lstset{language=python,
        numbers=left,
        numberstyle=\tiny,
        showstringspaces=false,
        aboveskip=-40pt,
        frame=leftline
        }
 
\begin{frame}[fragile]
\frametitle{\texttt{parrot.py}}
\begin{semiverbatim}
\pause
\begin{lstlisting}
if __name__ == "__main":
 
\end{lstlisting}
 
\pause
\begin{lstlisting}[firstnumber=last]
    print "Oh yes, the, uh,
           the Norwegian Blue..."
    print "What's, uh...
           What's wrong with it? "
 
\end{lstlisting}
 
\pause
\begin{lstlisting}[firstnumber=last]
    print "I'll tell you what's wrong with it,
           my lad."
    print "'E's dead,
           that's what's wrong with it!"
 
\end{lstlisting}
\end{semiverbatim}
\end{frame}
 
\end{document}

Overlayed Listings in Beamer

Tags: , , , ,

October 31, 2009

HOWTO: Use PyS60’s Bluetooth Console on Fedora/Ubuntu/Debian Linux

Filed under: Blog — krkhan @ 11:03 pm

While developing PyS60 apps is one of the most fun things you could do with your Nokia phone, debugging them isn’t as zippy as one would hope for in a Py development environment. To make up for that, PyS60 gives the developers an option for directly connecting to the interpreter through Bluetooth. Doesn’t sound very appealing? How about this: You connect your laptop with the cellphone, jump in at some place in the code while your app is executing and then use lappy’s big keyboard for exploiting different code and values in the interpreter. Sounds better?

To accomplish this on a Linux distro, you will need the following packages installed on your system:

Name Links
gnome-bluetooth
uucp/cu

After making sure that both are present on your system, install PyS60 on your phone if you haven’t already done so.

Now the fun part:

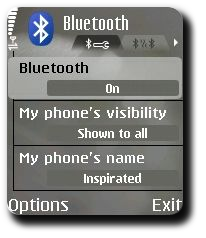
  1. Switch on Bluetooth in the cellphone.

    PyS60 Bluetooth HOWTO, Mobile screenshot #1

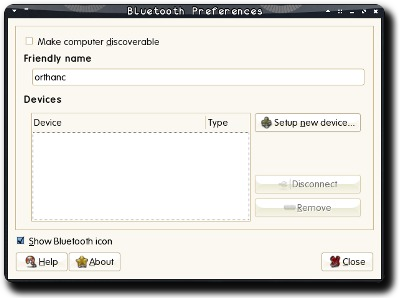
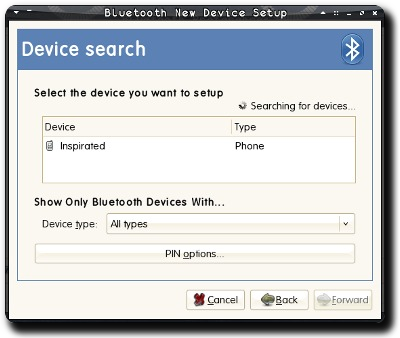
  2. Launch bluetooth-properties and click on “Setup New Device”.

    PyS60 Bluetooth HOWTO, PC screenshot #1

  3. Select your cellphone.

    PyS60 Bluetooth HOWTO, PC screenshot #2

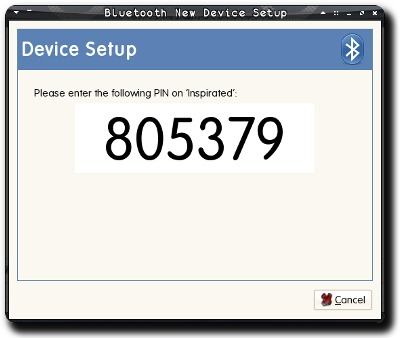
  4. You will be shown a pin.

    PyS60 Bluetooth HOWTO, PC screenshot #3

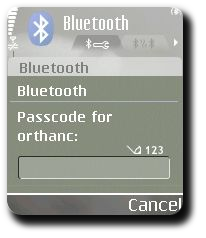
  5. Enter the pin when queried on the cellphone.

    PyS60 Bluetooth HOWTO, Mobile screenshot #2

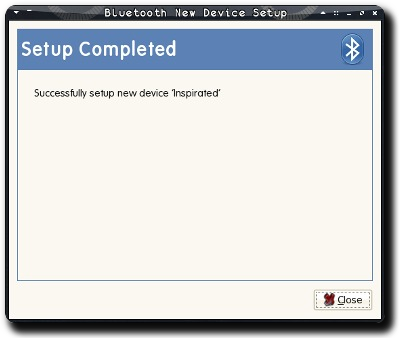
  6. The phone should be successfully paired.

    PyS60 Bluetooth HOWTO, PC screenshot #4

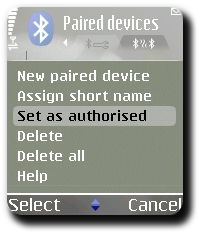
  7. Authorize your Linux system to make automatic connections to the phone.

    PyS60 Bluetooth HOWTO, Mobile screenshot #3

  8. As root, run this shell script:
    [root@orthanc ~]# ./rfcomm-listen.sh

    Serial Port service registered
    Waiting for connection on channel 2

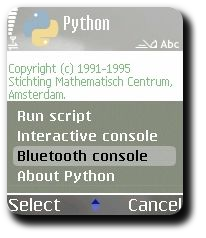
  9. Launch PyS60 interpreter and select “Bluetooth Console” from the application menu.

    PyS60 Bluetooth HOWTO, Mobile screenshot #4

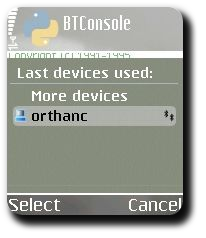
  10. Select your Linux machine.

    PyS60 Bluetooth HOWTO, Mobile screenshot #5

    The command you ran in previous step should have new output:

    [root@orthanc ~]# ./rfcomm-listen.sh

    Serial Port service registered
    Waiting for connection on channel 2
    Connection from 00:17:4B:B6:35:31 to /dev/rfcomm0
    Press CTRL-C for hangup

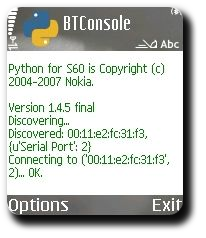
    The cellphone screen should be showing something like this:

    PyS60 Bluetooth HOWTO, Mobile screenshot #6

  11. As root again, open a new terminal and run:
    [root@orthanc ~]# cu -l /dev/rfcomm0

    Connected.

  12. Hit Enter till prompt (>>>) appears, then type:

    >>> import appuifw
    >>> appuifw.query(u'Hello World', 'text')

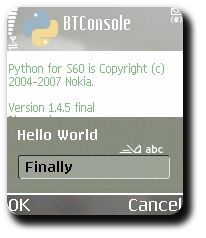
  13. Viola, you should have an input box on the mobile screen:

    PyS60 Bluetooth HOWTO, Mobile screenshot #7

  14. Enter any text and press the OK key. It should be show up in the terminal you were using to type in code:

    >>> import appuifw
    >>> appuifw.query(u'Hello World', 'text')
    u’Finally’

  15. Exit the interpreter by typing CTRL+D on an empty line:

    >>> import appuifw
    >>> appuifw.query(u'Hello World', 'text')
    u’Finally’
    >>>
    Interactive interpreter finished.
    cu: Got hangup signal

    Disconnected.

Pat yourself on the back. Now, you can use your Bluetooth console to import your modules, execute some stuff and then jump in the middle to test some extra lines or values. In fact, I found it to be a pretty darned good way of learning about PyS60’s API. Res secundae!

Tags: , , , , , , , , , , , , , , , ,

September 10, 2009

HOWTO: Use LaTeX mathematical expressions in PyGTK

Filed under: Blog — krkhan @ 10:04 pm

I had never really laid my hands on LaTeX until I required it in one of the helper applications for my graduation project. Unfortunately, the requirement wasn’t as simple as producing some documents as I had to embed mathematical expressions on the fly in my PyGTK apps. Googling around for the solution, I found GtkMathView which accomplished something similar to this albeit using MathML. However, my luck ran out on me again as the widget lacked Python bindings. The other solution was to generate transparent PNGs on the fly and include them as GtkImages. This worked rather well, as the final code allowed easy modifications to the generated expressions.

Requirements for the code were:

Final results:

LaTeX in PyGTK

And the simple code behind it:

1
2
3
4
5
6
7
8
9
10
11
12
13
14
15
16
17
18
19
20
21
22
23
24
25
26
27
28
29
30
31
32
33
34
35
36
37
38
39
40
#!/usr/bin/env python
"""An example demonstrating usage of latexmath2png module for embedding math
equations in PyGTK
 
Author: Kamran Riaz Khan <krkhan@inspirated.com>
"""
 
import gtk
import os
import latexmath2png
 
pre = 'gtktex_'
eqs = [
	r'$\alpha_i > \beta_i$',
	r'$\sum_{i=0}^\infty x_i$',
	r'$\left(\frac{5 - \frac{1}{x}}{4}\right)$',
	r'$s(t) = \mathcal{A}\sin(2 \omega t)$',
	r'$\sum_{n=1}^\infty\frac{-e^{i\pi}}{2^n}$'
	]
latexmath2png.math2png(eqs, os.getcwd(), prefix = pre)
 
def window_destroy(widget):
	for i in range(0, len(eqs)):
		os.unlink(os.path.join(os.getcwd(), '%s%d.png' % (pre, i + 1)))
	gtk.main_quit()
 
window = gtk.Window()
window.set_border_width(10)
window.set_title('LaTeX Equations in GTK')
window.connect('destroy', window_destroy)
vbox = gtk.VBox(spacing = 10)
window.add(vbox)
 
images = [None] * len(eqs)
for i in range(len(eqs)):
	images[i] = gtk.image_new_from_file('%s%d.png' % (pre, i + 1))
	vbox.pack_start(images[i])
 
window.show_all()
gtk.main()
Tags: , , , , , , , , , ,

August 30, 2009

HOWTO: Add grid lines to a GtkDrawingArea in PyGTK

Filed under: Blog — krkhan @ 6:29 pm

Recently, I needed to create some visualizations in a drawing area for one of my PyGTK apps. The PyGTK tutorial had an excellent writeup complete with a working example for immediate help. Unfortunately, my requirements were of a “grid” view on which other objects would be drawn. Naturally, I hoped for some variable on the GtkDrawingArea which I would set to true and have the grid lines drawn automatically. But since I couldn’t find any such magic setting in the API, I had to draw the lines manually.

Consequently, I could use either of the following approaches:

  • Loop horizontally and vertically while draw_line()ing.
  • Draw a 10×10 box as a tile and repeat it over the background.

The first approach would’ve worked faster but involved writing more code. The second was uglier — especially for larger images — but resulted in me having to add only a few lines to the example:

72
73
74
75
76
77
78
79
80
81
82
83
84
85
86
87
88
89
90
91
        xpm_data = ["10 10 2 1",
            " 	c #EEEEEE",
            ".	c #FFFFFF",
            "          ",
            " ........ ",
            " ........ ",
            " ........ ",
            " ........ ",
            " ........ ",
            " ........ ",
            " ........ ",
            " ........ ",
            "          "]
        tile_pixmap, tile_mask = gtk.gdk.pixmap_create_from_xpm_d(
            area.window, None, xpm_data)
        tile_gc = area.window.new_gc(fill = gtk.gdk.TILED,
            tile = tile_pixmap)
        width = int(self.hruler.get_range()[3])
        height = int(self.vruler.get_range()[3])
        area.window.draw_rectangle(tile_gc, True, 0, 0, width, height)

Turning this:

GtkDrawingArea Example

Into this:

GtkDrawingArea Grid Example

Note that the 10×10 tiles’ borders match prettily with the markers on top and left rulers. There will definitely be some more efficient method for achieving this but for the time being tiling serves my needs perfectly.

Tags: , , , , , , ,

April 7, 2009

HOWTO: Log Pidgin conversations selectively

Filed under: Blog — krkhan @ 7:32 pm

Pidgin is a multi-protocol instant-messaging client which I use for all my MSN/Google Talk/IRC communication. Apart from offering adept support for all of these protocols (and plenty others as well), Pidgin also provides decent logging support. However, I’m not at all interested in having my daily MSN conversations recorded. On the other hand, I prefer having my previous IRC chats with me for reference. Right now, Pidgin does not support any options in the Preferences which would allow me to selectively turn on logging based on the protocols I’m using. If I turn it on for chat windows, it also starts producing logs for every MSN chat I participate in.

Most of the people wouldn’t/don’t see any issue with this behavior. For those who do want to keep a history of their conversations only for particular protocols, here’s a quick workaround for doing it:

  • Check the appropriate options under the “Logging” tab in Preferences window.
  • Have a few chats the likes of which you’d prefer being logged.
  • Go to the directory containing Pidgin logs (default is ~/.purple/logs):
    [user@host ~]$ cd ~/.purple/logs/
  • See whether the protocols you want to be logged have a directory named for them:
    [user@host logs]$ ls

    irc msn

  • Remove the protocols you do not want to have logs for (in my case, MSN):
    [user@host logs]$ rm -rf msn
  • Change directory permissions to stop new protocols from getting logged:
    [user@host logs]$ chmod 500 .

And you’re done. Now, whenever you start a conversation in a protocol which does not have a respective directory in ~/.purple/logs, you’ll see a “Logging failed” error message in the conversation window. For other (allowed) protocols, logging will work as expected. To turn off selective logging, reset directory permissions with:

[user@host ~]$ chmod 600 ~/.purple/logs/

It is also possible to apply the same workaround on contacts. For example … :

  • [user@host ~]$ cd ~/.purple/logs/msn/
    [user@host msn]$  ls

    bestbuddy@live.com ignorantmoron@live.com

  • [user@host msn]$ rm -rf ignorantmoron@live.com
  • [user@host msn]$ chmod 500 .

… will disable logging for all MSN contacts including ignorantmoron@live.com, but will record everything communicated with bestbuddy@live.com. Like the previous example, you just have to reset directory permissions to re-enable nondiscriminatory logging:

[user@host ~]$ chmod 600 ~/.purple/logs/msn/
Tags: , , , , , , , , , ,

March 15, 2009

HOWTO: Use USB devices in Virtual Machine Manager with QEMU

Filed under: Blog — krkhan @ 3:09 pm

Every once a while, I need to take the backup of my Nokia N72 using PC Suite. Since the task had to be performed on Windows, I expected my virtualized machine to be able to do so. Unfortunately, Virtual Machine Manager does not provide any option in its interface which would allow me to use my USB devices in virtualized machines. Going through the documentation though, here’s the method through which I was able to solve my issue.

First of all, you should have the vendor and product ID’s of the USB device you want to use. Sounds alien? Use the command:

[user@host ~]$ lsusb

Which will show you something like:

Bus 001 Device 001: ID 1d6b:0002 Linux Foundation 2.0 root hub
Bus 005 Device 001: ID 1d6b:0001 Linux Foundation 1.1 root hub
Bus 004 Device 002: ID 0a12:0001 Cambridge Silicon Radio, Ltd Bluetooth Dongle (HCI mode)
Bus 004 Device 001: ID 1d6b:0001 Linux Foundation 1.1 root hub
Bus 003 Device 003: ID 0421:04c4 Nokia Mobile Phones
Bus 003 Device 002: ID 09da:000a A4 Tech Co., Ltd Port Mouse
Bus 003 Device 001: ID 1d6b:0001 Linux Foundation 1.1 root hub
Bus 002 Device 001: ID 1d6b:0001 Linux Foundation 1.1 root hub

The bold numbers in the line containing “Nokia Mobile Phones” are the vendor and product IDs respectively. Once you’ve noted them down for your required device (in my case: 0x421 and 0x4c4), list the virtual machines’ configuration files:

[user@host ~]$ sudo ls /etc/libvirt/qemu

networks windoze.xml

My virtual machine was named “windoze”, so windoze.xml is the file that I need to edit:

[user@host ~]$ sudo gedit /etc/libvirt/qemu/windoze.xml

In the editor, add the highlighted hostdev lines under the devices section (replacing the vendor and product IDs with the ones noted down from lsusb output):

<devices>
<emulator>/usr/bin/qemu-kvm</emulator>
<hostdev mode='subsystem' type='usb'>
<source>
<vendor id='0x0421' />
<product id='0x04c4' />
</source>
</hostdev>

Save and close the file. Restart the service:

[user@host ~]$ sudo service libvirtd restart

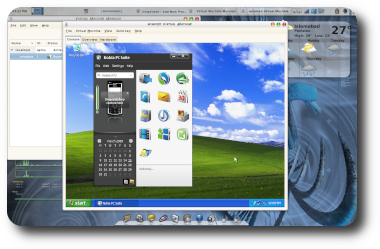
If everything went smoothly, the USB device should now be accessible from within the virtual machine:

Screenshot of Nokia PC Suite connected to a USB device in virtualized Windows
(Click on the thumbnail for larger version.)

Tags: , , , , , , , , , , , ,

March 9, 2009

HOWTO: Access Windows machines by their names on Eee PC

Filed under: Blog — krkhan @ 8:25 pm

More often than not, Linux users will end up in a situation where they’d need to access their Windows neighbors on LAN. This can easily be accomplished using IP addresses, but using NetBIOS names is just too convenient to be overlooked.

The Xandros distro on Asus’ Eee PC does not resolve NetBIOS names by default. To make it perform that, you can do the following:

[user@host ~]$ sudo apt-get install samba samba-common smbclient winbind
[user@host ~]$ sudo kwrite /etc/nsswitch.conf

Once the editor opens, spot the line:

hosts: files dns

And append “wins” at its end, making it:

hosts: files dns wins

Save the file, exit the text-editor, back on command-line:

[user@host ~]$ sudo /etc/init.d/samba start
[user@host ~]$ sudo /etc/init.d/networking restart

Reconnect your network, and viola — easy peasy, Eee PC!

Screenshot of Eee PC accessing a Windows PC on LAN by name
(Click on the thumbnail for larger version.)

Tags: , , , , , , , , , , ,

August 24, 2007

HOWTO: Download FLV videos from YouTube manually

Filed under: Blog — krkhan @ 8:37 pm

I’m well aware of the fact that this thing has been posted on various blogs countless times already; but if you haven’t noticed, YouTube has changed its page structure so that only a text-search of player2.swf?video_id= in the source code won’t yield the prolonged video_id. Instead, you now have to search for /watch_fullscreen?video_id= to locate the holy grail.

For those who’re new to this method, here’s what you have to do:

  • Open the YouTube video link for which you want to download the FLV.
  • Right-click anywhere on the page and click on ‘View (Page) Source’.
  • Press CTRL+F and search for the string: /watch_fullscreen?video_id=
  • Copy everything after the question mark until the end of quotes, as shown in the image below:

    YouTube video_id
    (Click to enlarge)

  • Type this in your address bar: https://www.youtube.com/get_video?[video_id you've just copied]
  • Hit Enter/Return, you’ll be offered a downloaded named get_video which is actually your desired FLV file. Save it somewhere locally and change its extension to .flv.

Here’s a list of players that you can use to play your downloaded FLV:

Bona fide :-) !

Tags: , , ,
Next Page »